DeepSeek Harness Guide: Install DSH, Configure the API, and Run Your First Agent Task
DeepSeek Harness (dsh) is DeepSeek AI's plugin-based open-source agent harness. This practical guide covers quick startup with npx, source setup, API configuration, workspace selection, a first task, headless mode, and common pitfalls.
Contents
English Version
Updated: 2026-08-19
Original sources: DeepSeek Harness official repository and its Web UI guide. This article has been rewritten and reorganized for Finding AI Tools. The screenshots come from the official documentation, and the project is MIT licensed.
DeepSeek Harness, or dsh, is DeepSeek AI's open-source agent harness. Rather than being a fixed chat client, it composes models, tools, permissions, workspaces, plugins, and interfaces into a modular runtime. For developers who want DeepSeek to inspect code, edit files, run commands, and work through an assigned task locally, it is closer to a development environment than a simple web chat.
One important caveat comes first: the project is currently in Developer Preview. Its interfaces, plugins, and configuration may change in breaking ways. It is a good fit for developers who are comfortable testing new tools, but not for an unreviewed critical production workflow. This guide starts with the most practical route: launch the Web UI, finish a real task, and only then decide whether source setup, plugins, or headless execution are worth your time.
What DeepSeek Harness Is For
DSH runs a local Web UI. Once you choose a project directory and configure a model, the agent can read and edit workspace files, run terminal commands, maintain a plan, and make tool calls within the active permission policy.
The workspace is the key difference from a normal chat window. Instead of working only from pasted snippets, the model can operate around the project directory you select. That makes it useful for repository discovery, scoped code changes, documentation cleanup, file-based analysis, and scriptable one-off jobs.
It is not simply a DeepSeek chat wrapper. Its runtime is plugin-based, and profiles combine different plugin and permission configurations. That is why the same dsh command can start Web and headless modes.
Before You Start
For the quick Web UI path, install Node.js and confirm these commands work:
node --version
npx --version
You do not need to clone the repository or install pnpm for the basic route. You do need a DeepSeek API key from the DeepSeek platform. Treat it like a password: do not put it in source code, screenshots, or commits.
For source development and plugin work, the official development guide lists Node.js 22.19+ or 24+, Corepack-managed pnpm, and Git 2.26+. Those are development prerequisites, not a requirement for trying the Web UI.
Fastest Setup: Start the Web UI with npx
Open a terminal in the project directory you want to use as the default workspace, then run:
npx @deepseek-ai/dsh web
On first run, npx downloads and launches DSH. The command prints the local URL. The documented default is:
http://127.0.0.1:3080
The working directory matters. DSH uses the directory where you started the command as its default filesystem location, so do not casually launch it from Downloads and then point it at unrelated projects. Also, starting the server does not grant the agent broad file access. You still choose a workspace in the UI, and sensitive actions remain subject to the active permission policy.
If port 3080 is occupied, pass an application port:
npx @deepseek-ai/dsh web --port 3081
Configure Your API Key and Model
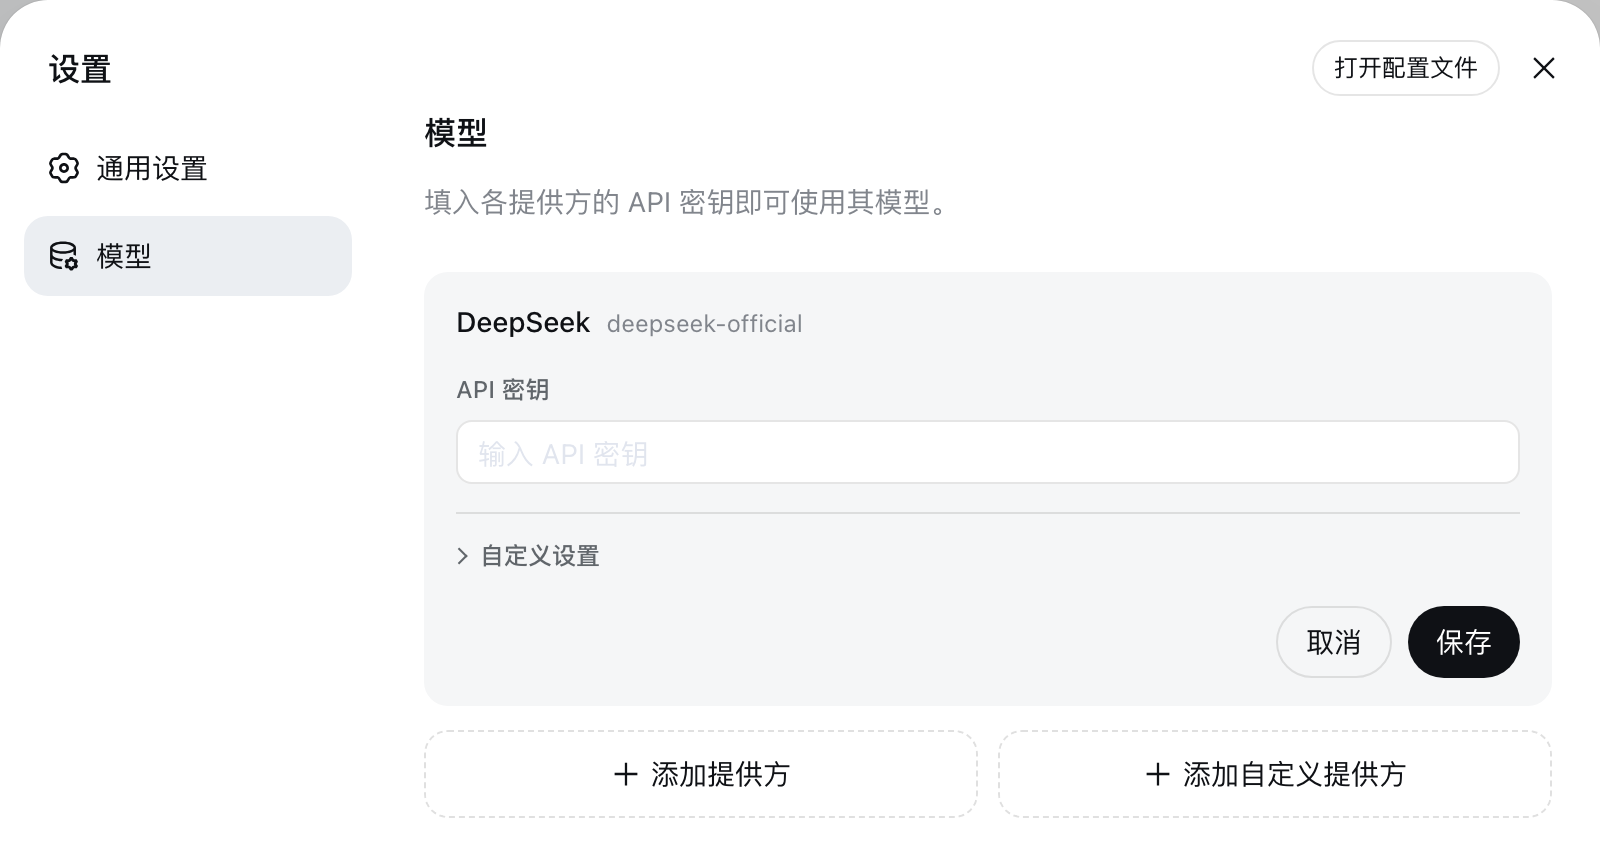
In the Web UI, open Settings → Models, find the DeepSeek card, paste your API key, and save it. The model route is ready for the next request; the server does not need to restart.
Image source: DeepSeek Harness official documentation.
The official docs state that saved keys are not returned to the browser in plaintext. Still, keep your local user profile, browser configuration, and terminal history treated as sensitive surfaces.
After saving, choose a configured DeepSeek model. New sessions use that model by default, while sessions that have already made requests retain their recorded model. If a saved default points to a provider you later removed, select an available model again before continuing.
Pick a Workspace and Run a First Task
Return to the main view, click Choose workspace, add your project root, and select it. The composer remains disabled until a workspace is chosen. That guard is intentional: it prevents the agent from acting on files before you have named the working directory.
For the first task, do not ask it to optimize an entire project. Start with a small, reviewable request:
Read the current repository only. Summarize the main directories and startup commands, list three risks to investigate, do not change files, and do not run commands that alter data.
This prompt limits scope, defines the expected output, and blocks destructive work. Once you trust its understanding of the repository, move on to a page, bug, test suite, or narrow refactor.
When the UI asks for approval, read the command and target path. Do not automatically approve an operation just because an agent generated it.
Custom Providers and Company Gateways
In addition to DeepSeek, DSH can add catalog providers or a custom OpenAI-compatible provider. The custom form is useful for company gateways, self-hosted proxies, and services not listed in the built-in catalog.
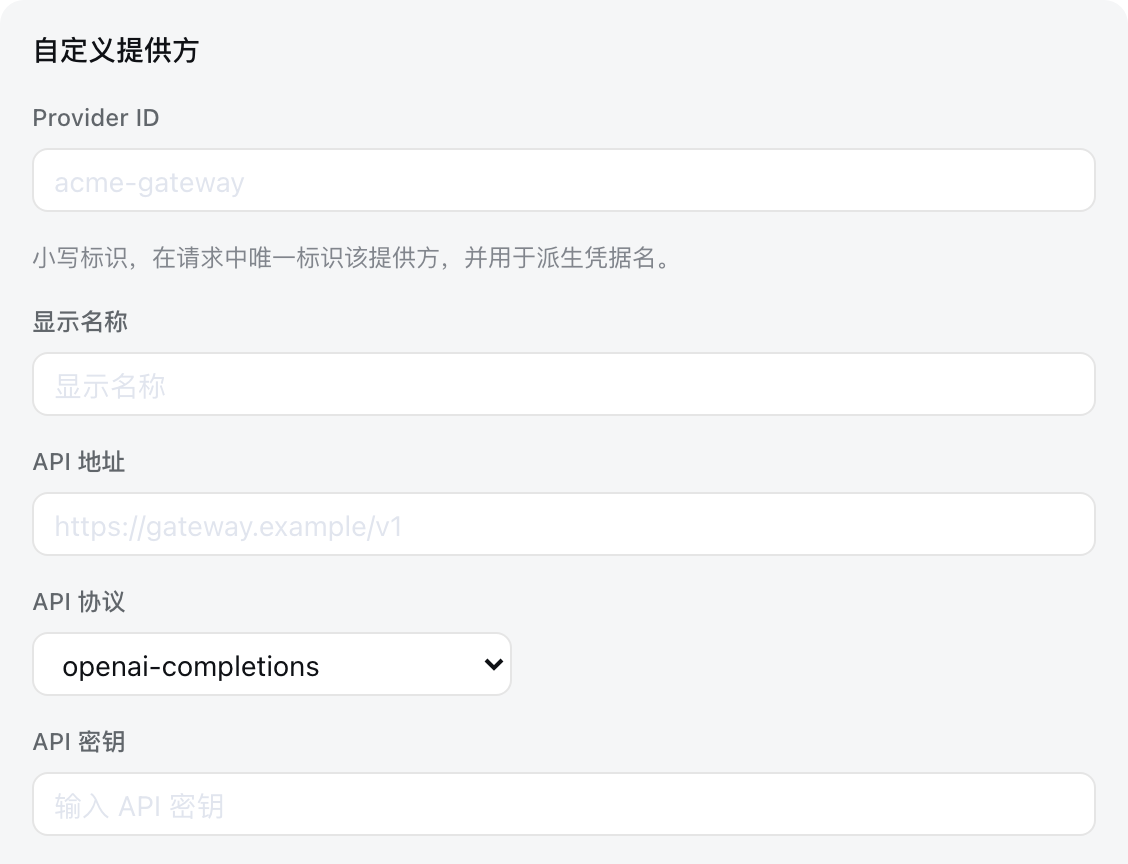
Image source: DeepSeek Harness official documentation.
The important values are the Provider ID, base URL, API protocol, credentials, and model list. Provider IDs are referenced by sessions, saved defaults, and credential references. If you need to rename one later, adding a new provider, migrating to it, and then removing the old one is safer than guessing at internal configuration.
Image input deserves separate attention. The official docs describe DeepSeek's default chat-completions route as text-only. A configuration switch cannot turn a text-only endpoint into a vision model. For custom endpoints, declare input: [text, image] only when the real endpoint supports image inputs; otherwise the provider will reject the request.
Run from Source When You Need to Develop
Use a repository checkout for plugin development, source inspection, or fixed-version testing:
git clone https://github.com/deepseek-ai/deepseek-harness.git
cd deepseek-harness
corepack enable
pnpm install
pnpm run build
pnpm dsh web
Source mode is not inherently better than npx. Its value is access to the complete monorepo, profiles, plugins, and a reproducible revision. The first install also initializes local Git hook and development configuration, so avoid mixing it blindly into an unrelated production repository.
For everyday DSH use, the npx route is shorter and easier to remove.
Headless Mode for One-Off Tasks
The CLI also supports a headless profile. It creates a persistent new session, prints the final answer, and exits:
npx @deepseek-ai/dsh --profile headless "Read the current project only. List package.json scripts and their purpose. Do not modify files."
This is useful for inventory reports, pre-checks, or external scripting. It does not bypass permissions: file edits, commands, and other tool usage are still governed by the active profile and permission policy. Test its behavior in a non-critical directory before integrating it into team automation.
Common Problems
The page does not open: Use the exact address printed by the terminal. If the port is busy, choose a new one and start DSH again.
The composer is disabled: Select a workspace in the main UI.
MISSING_CREDENTIAL: Save the provider key in Settings or check the referenced environment variable.
UNKNOWN_MODEL: Select a configured model. For a custom provider, verify that the model ID matches the actual service.
An image is rejected before sending: The model route does not declare image input. DeepSeek's default chat-completions route is text-only; use a genuinely vision-capable endpoint and declare it correctly for custom models.
An upgrade breaks a plugin or configuration: That is a real Developer Preview risk. Back up configuration, review official release notes and Discussions, and do not introduce unverified plugins into a workspace containing production code or secrets.
A Sensible First Week with DSH
Start by launching the Web UI with npx, use a non-critical repository, configure your API key, select the workspace, and complete a read-only task. Then gradually allow editing and command execution as you verify output quality, cost, and approval behavior. Move to custom providers, headless mode, and plugin work only once that baseline is solid.
DeepSeek Harness gets its strength from composability. The tradeoff is that versions, permissions, and configuration deserve more attention than in a hosted chat product.
Sources
Claude Fable 5 Explained: Mythos-Class Capability, Pricing, Safeguards, and Developer Impact